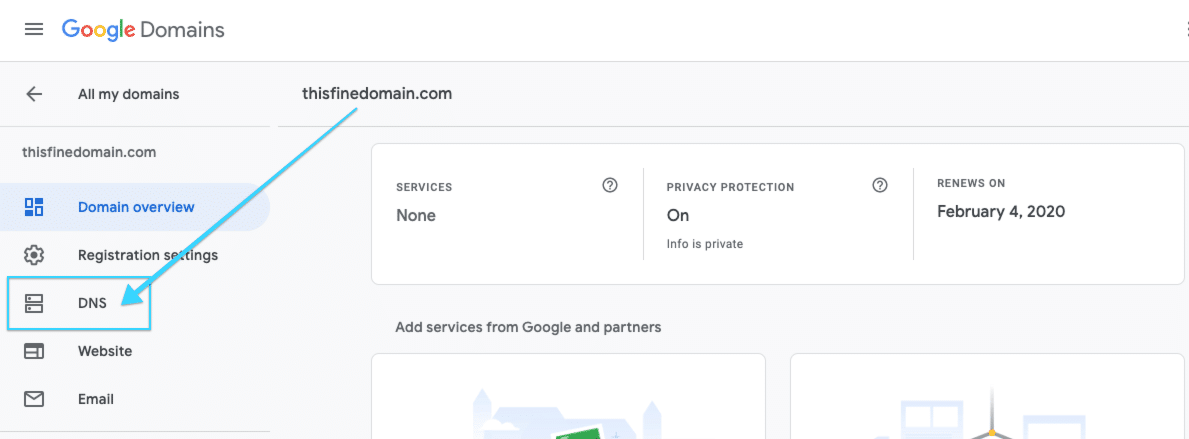
A Step-by-step walkthrough for adding your A and CNAME Records within Google Domains to get your new website live.
For hosting with The Image Stop ltd. / PenguinHosting
Of note: The instructions below are accurate at the time of this posting. Systems, names, etc… may at times be changed within the Google interface but the steps should remain the same.
Log in to Google Domains
1. In a separate tab, log in to the Google Domains admin page.
2. Click Manage for the domain you want to point to your new site hosting.

3. Click the DNS menu option in the left sidebar.

4. Scroll down to the bottom of the DNS page to the section entitled Custom Resource Records. This is where you’ll add your DNS records.

Configure the A record
You may see additional records in this section, especially if your domain was pointed to a different host previously. For now, we’re just going to be concerned with the A record, since it’s the record responsible for pointing your domain to your website.
Be careful about modifying or deleting any other records – especially MX records, which are responsible for email. Also, it never hurts to take a screenshot before you start making changes.
1.In the first field for Name, enter @. (the image shown may not be your correct IP address – please be sure to use the one sent to you by The Image Stop ltd. / PenguinHosting)

2. In the dropdown menu for Type, select A.
3. The next field is for TTL (Time To Live), which can be left at the 1-hour default.
4. In the Data field, enter your IP address. In this example, the IP is 151.101.66.159.
5. Click the Add button to save the record.
Note: If an A record with the Name of @ already exists, you can click Edit and modify it using the steps above as a guide. Don’t forget to hit the Save button!
Unless you have a subdomain setup, for example, shop.thisfinedomain.com, you should only need one A record value. At the very least, make sure that you have one A record with @ set as the host which is pointing to your supplied IP address.
Optional: Configure CNAME record for www
We recommend you also set a CNAME record in your zone file to allow use of the www prefix. A CNAME (aka canonical name) points a subdomain to another domain name.
For example, with a CNAME in place, visitors entering www.thisfinedomain.com in their browser will be redirected to thisfinedomain.com. Without a CNAME record, visitors will instead reach an error page.
1.In the first field for Name, enter www.

2. In the dropdown menu for Type, select CNAME.
3. The next field is for TTL (Time To Live), which can be left at the 1-hour default.
4. In the Data field, enter your root level domain. In this example, the root level domain is thisfinedomain.com.
5. Click the Add button to save the record.
Double-check your work
1.Check the DNS records to make sure the changes have been updated. Your records should look like this (with your domain’s information instead of the example domain here):

After this has all been completed and verified let your project manager at the Image Stop ltd. / PenguinHosting know and we will ensure that your hosting is set for accepting the domain.
DNS propagation times: DNS by nature can take 24-48 hours to fully propagate across the entire internet, though we generally see much quicker propagation. By default, Google sets the Time to Live (TTL) setting for each record set to 1 hour. Depending on when that last check was, you could see your changes go live in an hour or less.
Custom name servers: If you’ve made changes to your DNS records but nothing seems to be happening, your domain may be using custom nameservers instead of Google’s defaults. This means that Google’s DNS settings will not have any effect. In this case, you will need to adjust your DNS settings at the name server’s admin panel instead. This situation is most likely when a proxy like Cloudflare or Sucuri is being used. You can confirm the name servers in use by following Google’s help article.
Still need help?
If you get stuck, or have any questions along the way, we’d love to help! Reach out to our support team with a screenshot of your current DNS records or provide us with your current registrar login and we can schedule a call for assistance.
